Description
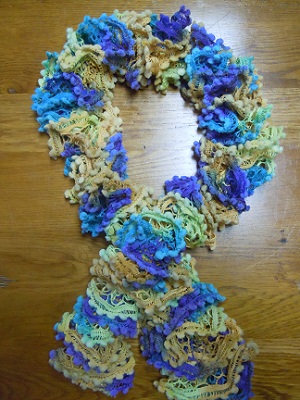
This ruffle crochet scarf is made in much the same way as our frilly crochet scarf except it is made with a different brand/type of yarn which has larger holes. Because Starbella yarn has larger holes, there is no need to skip a hole in between each stitch.
Note: When you crochet with Starbella yarn, you do not wrap the yarn around your hook as you would with regular yarn. Instead, you use the holes along the top edge and insert your hook into them.
Materials and Supplies
Approximate finished size = 54" long
Ruffle Scarf Crochet supplies:
- 1 Ball Starbella yarn by Premier Yarns 3.5oz
- Size K* (American) crochet hook
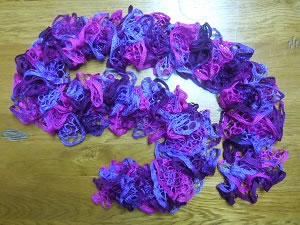
Pompom Scarf Crochet supplies:
- 1 Ball Flamenco yarn by Loops & Threads 3.5oz
- Size K* (American) crochet hook
*Our sample was made with a size K crochet hook but you can use any size you have on hand. A larger hook (size J through N) is easier to work with than a smaller hook. There is no need to worry about gauge with this project.
Craft Instructions
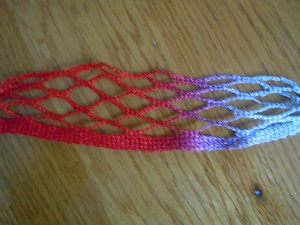
Before you get started, you will notice that this yarn comes bunched up. Pull out a piece and use your fingers to gently stretch it out so that it is fairly flat. Note that one edge has a thick ribbon like border - this will be the bottom edge. You will work with the top edge.
Tip #1: After making several of these scarves, I found it was easier to take a few minutes before starting to crochet to open up the Starbella and wind it into a new ball. The way I did this was to remove the wrapper, untwist the Starbella and wrap it around the wrapper. Just wrap the Starbella in one direction around the wrapper (don't go in all different directions as you would when making regular ball of yarn) If you take a few minutes to do this before you begin it will significantly speed up the time it takes to actually crochet the scarf.
Tip #2: Ignore the top row of holes and use the row directly below it. This will make your crochet stitches much easier to see therefore much easier to work with. The first scarf I made, I worked into the very top row and it was quite difficult to find the stitches amongst the ruffles especially if I put my work down for any reason. Your eyes will thank you for using the second row.
Tip #3: When crocheting this scarf, always insert your crochet hook from front to back.
Tip #4: When you reach the end of a row, always turn your work in the same direction.
Lets get started ~
- Count over three holes and fold the yarn back on itself at this point. For the first three stitches, you will be working through two layers. This is to give the end of the scarf a nice finished look and hide the cut end.
- Chain (ch)6 - To do this, insert the crochet hook in the first hole from front to back (remember you will be going through two layers), insert the hook from front to back into the next hole. Pull the first stitch up and over the second stitch just as you would in a regular chain stitch. Repeat this 5 more times. You are going to be working with 5 stitches in each row. The extra chain will be made at the end of each row to keep it nice and loose when turning your work.
- Turn. Skip your first ch, single crochet (sc) in each of the other 5 chain stitches, ch 1 turn
- For each of the remaining rows, work one sc in each sc of the previous row, ch 1 turn.
- When you complete a row and don't have enough Starbella to complete another row, pull the remaining strand of yarn through the last stitch. Tie a knot close to your work and cut off the extra about 1/4" from the knot. This knot will not show with all the ruffles.
Note: To make the Pompom Scarf, follow the same directions as for the Ruffle Scarf. The only difference is you use a ball of Flamenco yarn which can be purchased at your local Michael's Stores. Flamenco yarn has mini pompoms on the bottom edge.